
When old paver sealer clouds, peels, or traps moisture: why stripping is the only real fix
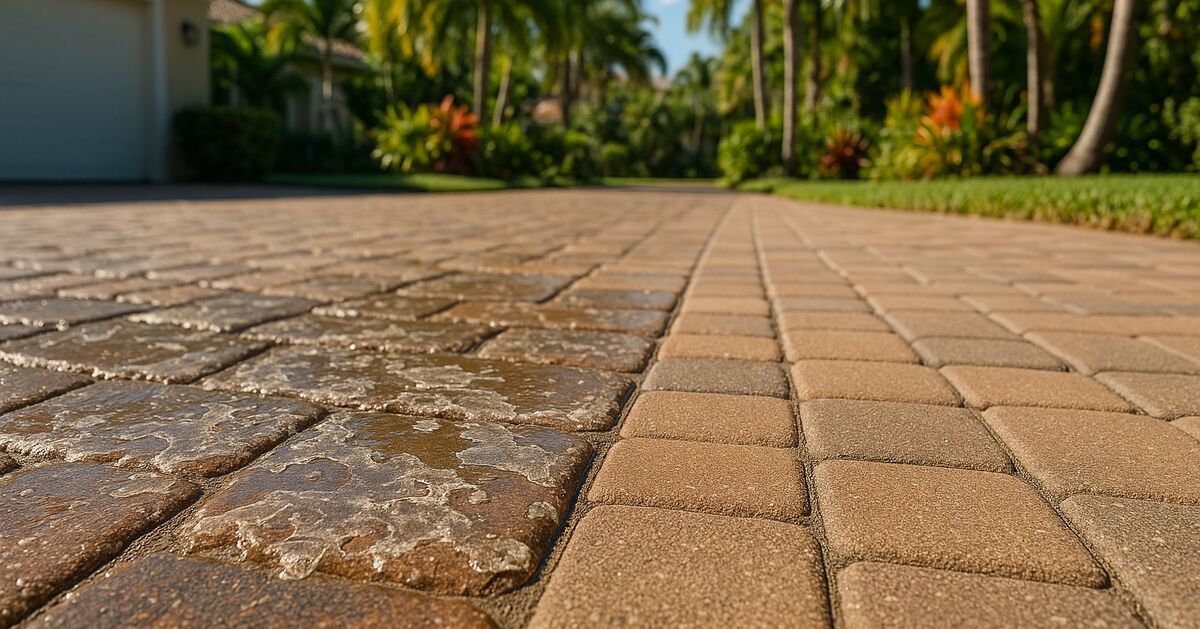
Reapplying sealer over a failing coat is one of the most common and costly mistakes homeowners make with their pavers, and it turns a one-afternoon job into a multi-day restoration.
If your sealer has gone cloudy, is lifting at the edges, is bubbling up in patches, or looks like it's trapping a milky film underneath, you are past the point of "just add another coat." The old sealer has to come off completely before anything good can happen. This post explains exactly why that is, how to recognize when you've crossed that line, and what the stripping process actually looks like so there are no surprises.
What failing sealer actually looks like (and what it's telling you)
Sealer doesn't just wear away gracefully. On pavers here in Sarasota, Bradenton, Lakewood Ranch, and throughout Southwest Florida, it tends to fail in a few recognizable patterns because of our specific combination of intense UV radiation, high humidity, and frequent afternoon downpours.
Cloudiness or a milky haze is the most common complaint. The sealer appears white or opaque rather than clear or glossy. This usually means moisture got trapped beneath the sealer film. It can happen when sealer is applied over damp pavers, when the sealer cures too fast or too slow in tricky weather conditions (something we cover in detail in our post on how Gulf Coast heat and humidity affect paver sealer cure time), or simply when an old coat has degraded to the point where it's no longer bonded to the paver surface.
Peeling, flaking, or lifting edges tell you the adhesion between the sealer and the paver has broken down. You'll often see this start along grout lines or at the corners of individual pavers first. Once it starts lifting, water gets underneath, and every rain event makes the problem worse.
Bubbling or blistering happens when moisture or gas is trapped and trying to escape through the sealer film. Press one of those bubbles. If it's soft, there is liquid underneath. If it's hollow and brittle, the sealer has hardened over an air pocket. Either way, that area is no longer protecting your pavers at all.
A gummy or tacky surface that grabs your shoe or collects dirt unusually fast usually means the sealer never cured properly in the first place, or was applied too thick. A sealer in this state can't be refreshed. It needs to be dissolved and removed.
Multiple overlapping coats that have built up over years can create a thick, uneven plastic-like layer that cracks under thermal expansion. Pavers get extremely hot in our Florida sun. That film expands and contracts differently than the paver beneath it, and eventually something gives.
Why "just seal over it" doesn't work
This is the part that surprises a lot of homeowners. If there's still some sealer on the pavers, why not just apply fresh sealer on top?
New sealer bonds to paver surface material and to existing sealer that is still well-adhered and chemically compatible. Once the existing sealer has lost adhesion, has moisture trapped beneath it, or has partially delaminated, fresh sealer applied on top bonds to a compromised layer, not to the paver itself. The new coat will fail at the same rate as the old one, or faster. You've doubled the problem.
There's also a chemical compatibility issue. If you don't know exactly what type of sealer was applied before (solvent-based vs. water-based, acrylic vs. polyurethane vs. epoxy-modified), applying a different formulation on top can cause immediate reactions: bubbling, whitening, or complete failure within days. Our paver sealing and restoration services always include identifying what's already on the surface before we touch it, for exactly this reason.
And if moisture is already trapped under the existing coat, adding another sealed layer on top simply locks that moisture in longer. Trapped moisture in a paver system leads to efflorescence, mold growth, and over time, can accelerate the breakdown of the sand in the joints. You can read more about what happens to joint sand when water is involved in our post on how joint sand keeps washing out of your pavers in Florida.
How to know if your sealer has reached the point of no return
Not every dull or slightly hazy paver needs to be stripped. Here's a simple field test you can do yourself.
The water bead test. Drip a small amount of water onto your pavers in several spots. If the water beads up and rolls off, the sealer is still doing its job even if it doesn't look pretty. If the water soaks in immediately, the sealer is gone or nearly gone. A new coat can go on once the surface is properly cleaned.
The tape test. Press a strip of painter's tape firmly onto the paver surface, leave it for about 60 seconds, and pull it off quickly. If sealer lifts with the tape, it's not adhered. Stripping is necessary.
The scratch test. Drag a coin or a key across a less visible section of paver. If the sealer flakes, powders, or comes off in ribbons, it has broken down and lost flexibility. It needs to come off.
Visual bubbling or lifting that's widespread. If the problem is isolated to one small patch, maybe a repair is possible. If it covers more than 20 to 30 percent of the surface, stripping the whole area is almost always more cost-effective than chasing patches.
The "second coat was applied too soon" scenario. If you had the pavers resealed in the last year or two and the problems started shortly after, there's a real chance a new coat was applied over an incompatible existing coat or over pavers that weren't fully dry. That full system needs to come off.
If you're unsure, the best move is to get an experienced eye on it. Our team works across Lakewood Ranch, Wellen Park, Venice, Nokomis, and every community in between. A quick look is usually all it takes to tell a homeowner whether they need a strip-and-reseal or just a deep clean and fresh coat.
What sealer stripping actually involves
Stripping paver sealer is not the same as pressure washing. Pressure alone almost never removes sealer completely. The sealer has to be chemically dissolved first.
Here's how the process works in practice.
Step 1: Chemical stripper application. A purpose-formulated solvent or alkaline stripper (depending on the sealer type) is applied to the paver surface and allowed to dwell. The chemistry breaks the bond between the sealer film and the paver. This is where knowing what type of sealer is already present matters enormously. The wrong stripper can set a sealer rather than loosen it.
Step 2: Agitation. Once the stripper has had time to work, the softened sealer is scrubbed to break it up further. This is often done with stiff-bristle brushes or a low-speed floor scrubber for larger areas.
Step 3: Extraction and rinsing. The dissolved sealer residue has to be flushed off the surface completely. This is typically done with a controlled pressure rinse. The runoff contains chemical residue and dissolved sealer, so proper containment and disposal matters, especially near pool decks or storm drains.
Step 4: Drying. This step cannot be rushed. Pavers need to be genuinely dry, not just surface-dry, before new sealer goes on. In our humidity here on the Gulf Coast, that can mean waiting longer than you'd expect. If new sealer goes on while there's residual moisture in the paver, you're starting the same problem cycle over again.
Step 5: Joint sand assessment. Stripping often dislodges or weakens joint sand, especially if the sand was already marginal. Before new sealer is applied, the joints should be assessed and refilled or replaced as needed. Our post on re-sanding vs. polymeric sand before sealing walks through exactly what to look for.
Step 6: Fresh sealer application. Only now is it appropriate to apply new sealer. Because the surface is fully clean and the pavers are dry, the new coat bonds directly to the paver material itself. Done correctly, this is the longest-lasting result possible.
Special considerations for pool decks and lanais
Pool deck pavers are the most common place we see failing sealer on the Gulf Coast. The combination of pool water splash-back, chemical exposure (especially in saltwater pools), direct Florida sun, and foot traffic from wet feet creates a punishing environment for any coating.
Cloudy sealer on a pool deck is particularly worth taking seriously because it traps moisture right where you don't want it, against a surface that's already wet a good portion of the time. That's a reliable recipe for algae growth, mold, and slippery surfaces. If you have a saltwater pool, the chemistry involved is even more aggressive on sealers. Our dedicated post on why saltwater pool pavers deteriorate faster gets into the specifics.
One more thing to flag for pool deck situations: stripping a pool deck means chemical runoff near your pool. A professional job includes protecting the pool water and skimmer drains during the process. This isn't a DIY-friendly task on a pool deck for that reason alone.
What homeowners in Parrish, Palmer Ranch, and Bradenton often ask us
"Can I rent a stripper and do it myself?"
You can rent chemical strippers, yes. The challenge is that consumer-grade strippers are often weaker formulations, and identifying which type of stripper matches your existing sealer requires some experience. More often than not, a DIY strip job leaves residue behind that causes the new sealer to fail in patches. If you're going to invest in new sealer, stripping it properly is worth doing right.
"How long will the pavers be out of service?"
Typically, plan for two to three days from start to finish. Chemical dwell time, scrubbing, rinsing, and drying all take time. In cooler or more humid weather, the drying phase may take longer. Your service provider should give you a realistic timeline before the job starts.
"Will the pavers look the same after stripping?"
They'll look like bare, clean pavers, which is a good thing. Stripping removes staining and discoloration that was locked under the old sealer. Many homeowners are surprised by how much better their pavers look once the old failing coat is gone, even before new sealer goes on.
The bottom line
Cloudy, peeling, bubbling, or tacky sealer is not a cosmetic inconvenience. It's a sealer system that has stopped protecting your pavers and started working against them. Applying fresh sealer on top isn't a solution. It's a delay that makes the eventual removal harder.
The right sequence is: strip completely, let the pavers fully dry, reassess and repair the joints, then apply fresh sealer to a clean surface. Done that way, a properly sealed paver surface can look sharp and perform well for years.
If you're seeing any of the warning signs described here and want an honest assessment of where your pavers stand, our full service area covers all of Sarasota and Manatee Counties. You're also welcome to browse our frequently asked questions or get in touch directly to set up a time for us to take a look. No pressure, just a straight answer on what your pavers actually need.
Get started
Request a free quote
Tell us what you need. No pressure, and a real person gets right back to you.