
Sealing over old sealer without stripping: the exact failure modes
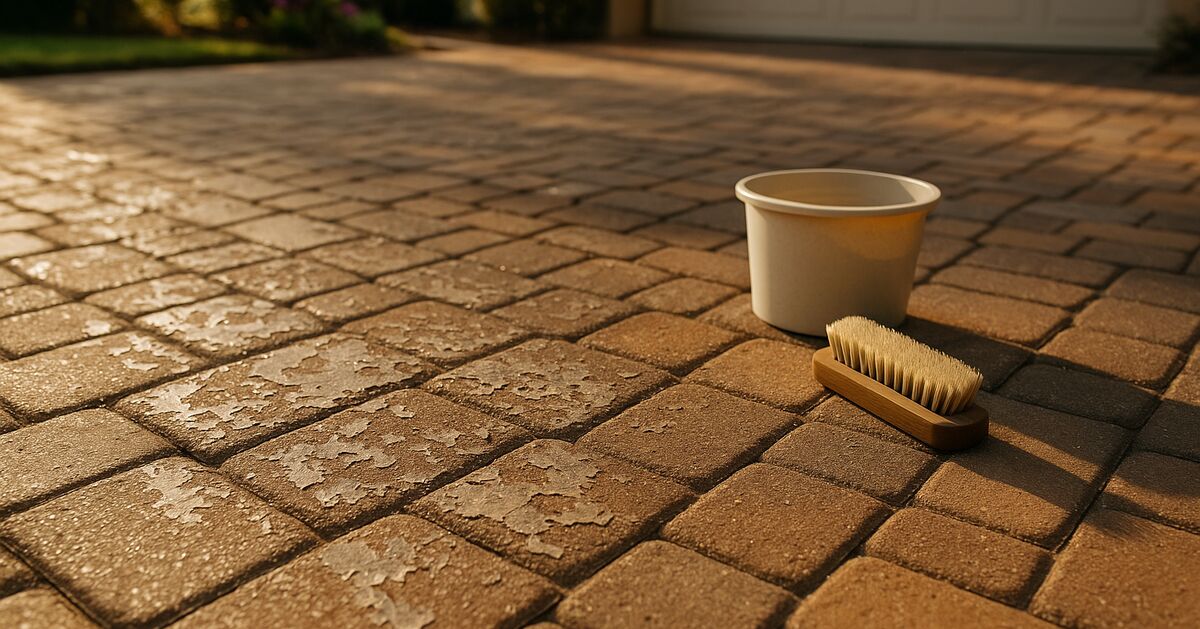
Skipping the strip job and rolling fresh sealer straight over an old coat is one of the most reliably regretted decisions a homeowner can make with their pavers. The result rarely looks bad the day it's done, which is exactly what makes it so frustrating when things fall apart a few weeks later. Understanding the mechanics of why this fails helps you see why there's no clever workaround.
Why layering sealers seems like a good idea
The logic is understandable. The driveway or pool deck looks a little dull, the surface feels gritty, or you can see a few spots where the old sealer has flaked. A fresh coat looks like it should cover all of that, the same way a new coat of paint freshens up a wall. And for paint on smooth drywall, that comparison isn't entirely wrong. For paver sealer on a textured, porous surface that lives outdoors in Florida heat, the comparison breaks down almost completely.
Paver sealers, whether solvent-based acrylics, water-based acrylics, or polyurethanes, work by bonding to the paver material itself or to a sound, compatible previous layer. When the existing sealer is degraded, incompatible, or simply old, that bonding chemistry fails. You end up with a new film sitting on top of an unstable substrate, and whatever weakness existed in the old coat becomes the weak point of the whole system.
Failure mode 1: delamination and peeling
This is the one homeowners notice first. Two to six weeks after a re-coat, sheets or chips of sealer begin lifting away from the surface. Sometimes it starts at the edges of pavers. Sometimes it happens in the middle of a flat field. In either case the cause is the same: the new sealer bonded to the old sealer, but the old sealer didn't have enough adhesion left to hold both layers to the paver underneath.
Think of it like taping a piece of paper to a wall with old, brittle tape. The new tape bonds fine to the old tape, but when the old tape lets go, both layers peel away together.
On a Bradenton or Sarasota driveway that gets direct afternoon sun for six or more hours a day, thermal expansion and contraction accelerates this failure dramatically. Pavers heat up, expand slightly, cool overnight, contract. Each cycle tugs at the sealer film. A film bonded directly to sound paver stone can flex with that movement. A film bonded to an already-failing intermediate layer cannot, and it delamination faster than it would have in a cooler climate.
Our paver sealing and restoration services always begin with an assessment of the existing coating precisely because of this. If the old layer shows any adhesion failure, delamination becomes a near certainty without stripping.
Failure mode 2: cloudiness and whitening
Cloudiness after resealing is often a moisture problem, and double-coating without stripping makes moisture entrapment more likely. Here's how it works.
Every paver surface, even a sealed one, is slightly vapor-permeable. Ground moisture wicks up through the base, through the paver body, and eventually reaches the underside of the sealer film where it evaporates and escapes. When you lay a new sealer film over an old one, you are doubling the barrier that vapor has to escape through. If there are any micro-cracks or pinholes in the old layer (extremely common in aged sealer), moisture can enter from underneath but then get trapped between the two layers. When that trapped moisture can't escape, it scatters light passing through the film, producing the familiar milky or white haze.
In neighborhoods where the water table sits high, this problem tends to be more pronounced. The ground simply pushes more vapor upward. Owners in those areas who have dealt with this are often surprised to learn that the cloudiness appeared even though the surface looked dry before they recoated. "Looked dry" and "was dry at depth" are two different things.
You can read more about how cloudiness and trapped moisture develop in our post on when old paver sealer clouds, peels, or traps moisture. The short version: once moisture is trapped between two sealer layers, the only fix is to strip both layers, let the paver breathe and dry, and start clean.
Failure mode 3: incompatible chemistry between old and new sealer
Not all sealers are chemically compatible with each other. A water-based acrylic applied over a solvent-based acrylic can lift the old layer because the solvents in the new product partially dissolve and destabilize the existing film before it cures. A polyurethane topcoat applied over an old acrylic layer may simply refuse to bond, sitting on top like oil on water and curing in a way that leaves it brittle and easy to scratch off.
The homeowner rarely knows what product was applied previously, especially if the sealer was applied by a prior owner or by a contractor who didn't leave records. A common scenario in Lakewood Ranch and Wellen Park communities is that the builder's sealer (often a basic water-based product applied quickly and cheaply before handoff) is still partially present, and a homeowner or a well-intentioned contractor applies a premium solvent-based product on top of it without testing compatibility. The incompatibility shows up as fisheyes, cratering, or complete delamination within days.
There is a simple field test for compatibility: apply a very small amount of the new product to an inconspicuous area and let it cure fully before proceeding. But the honest reality is that if you don't know what's under there, the safest and most professional approach is to strip. Stripping removes the variable entirely. Our frequently asked questions page covers what stripping involves if you want a quick overview before diving deeper.
Failure mode 4: magnified surface defects
Old sealer that has worn unevenly, something that happens on every driveway and pool deck over time, leaves a surface with high spots (where sealer is still thick) and low spots (where it has worn thin or disappeared). Applying a new coat does not level this out. It follows the existing topography and in many cases makes the variation more visible, because the new sheen highlights every ridge, puddle mark, and worn patch.
On a pool deck in Parrish or Palmer Ranch, where the paver surface is already reflecting sunlight at low angles in the morning and late afternoon, this kind of uneven finish is very obvious to anyone standing at the edge of the pool looking across the surface. What looked like a dull but uniform surface before the re-coat now looks blotchy and inconsistent, even though the product itself went on fine.
Stripping back to bare paver and recoating from scratch gives you a uniform substrate and a uniform result.
Failure mode 5: reduced slip resistance
This one has real safety implications. Most quality paver sealers for pool decks and other wet areas incorporate or are designed to be used with a non-slip additive, typically aluminum oxide or a similar angular grit. That additive sits at the top of the sealer film and creates the texture that prevents slipping on a wet surface.
When you add a second layer of sealer over the first without stripping, that second layer partially buries the texture of the first. The new surface is smoother than either layer was on its own. On a dry day, the difference is invisible. On a wet pool deck, the difference is a measurable reduction in traction.
Per guidance from the Pool & Hot Tub Alliance and general safety standards for wet pedestrian surfaces, adequate slip resistance on pool decks is not just an aesthetic preference; it is a meaningful safety requirement. A re-coat that reduces the surface texture profile works directly against that goal. Homeowners in Sarasota and Bradenton with pool and lanai paver projects should be especially mindful of this because their pool decks see water almost year-round.
Why stripping feels like overkill (and why it isn't)
The reluctance to strip usually comes down to two things: cost and time. Stripping adds a step to the process and adds to the project cost. That's real. But the failure modes described above are not hypothetical or rare edge cases. They are the predictable outcomes of applying sealer over a compromised substrate, and they do not fix themselves. When delamination or cloudiness sets in, the remediation always involves stripping anyway, plus the cost of the failed re-coat that preceded it.
Put another way: stripping before recoating is a one-time cost. Skipping the strip is often a two-step cost, paid later, with frustration included.
Homes in Wellen Park that were sealed by builders with commodity products are a good case in point. The original builder-applied sealer is often just a few years old, already showing wear, and may not have been applied over properly prepared or sanded joints. Owners who have tried to save money by simply recoating frequently report the exact failures described above. The owners who invest in a proper strip-and-reseal don't come back with those complaints. For a deeper look at what new-construction sealers leave behind in Wellen Park, our post on why Wellen Park pavers are showing wear already covers the specifics in detail.
How to know whether stripping is necessary before you start
A few field tests can give you a reasonable picture of the existing sealer's condition before any work begins.
- The water bead test. Splash a small amount of water on the surface. If it beads up vigorously, a significant amount of sealer is still present. If it absorbs quickly, the sealer is largely gone and stripping may be minimal.
- The scratch test. Drag a coin or key across the surface with moderate pressure. Sound, well-bonded sealer resists scratching. A layer that flakes, powders, or lifts easily at the edge is telling you it has lost adhesion.
- The tape test. Press a piece of strong tape firmly onto the surface, leave it for a minute, then pull sharply. Any sealer that comes away with the tape has insufficient adhesion to serve as a base for a new coat.
- Visual inspection in raking light. In early morning or late afternoon, look across the surface with the sun at a low angle. Delaminated bubbles, uneven sheen, and areas of inconsistent color are much easier to spot in raking light than under midday sun.
If any of these tests raise flags, a professional assessment is the right next step. Our team works across Lakewood Ranch, Bradenton, Venice, Nokomis, Parrish, and the surrounding communities, and we are straightforward about what we find. If stripping is necessary, we'll say so and explain why. If the existing layer is in good enough shape to be recoated, we'll say that too.
What proper stripping actually involves
A chemical stripper formulated for paver sealers is applied to the surface, allowed to dwell until it softens the existing film, and then agitated with appropriate brushes or pads. The softened sealer is then rinsed away with a pressure washer. Depending on the number of existing layers and the type of sealer involved, this process may need to be repeated more than once. The surface is then allowed to dry fully, which in Florida's humidity requires genuine patience and often a waiting period of 24 to 48 hours minimum before new sealer goes down.
Skipping or rushing the dry time after stripping creates its own cloudiness problem, and in our humid Gulf Coast climate (with average relative humidity regularly above 70 percent, per NOAA climate data for the region) the dry-time step is not something to rush. The connection between humidity and cure time is worth understanding on its own, and our post on how Gulf Coast heat and humidity affect paver sealer cure time goes into that in detail.
The bottom line
Fresh sealer over old sealer without stripping fails in predictable, documented ways: peeling, cloudiness, chemical incompatibility, uneven finish, and reduced slip resistance. These are not worst-case scenarios. They are the natural outcomes of applying a coating system to an unstable or contaminated substrate. The strip is not an upsell. It is the part of the job that makes everything else work.
If your pavers are overdue for a proper restoration and you're not sure what the existing surface needs, get in touch with us for an honest, no-pressure assessment. We cover all of the communities across our service area, and we'd rather tell you exactly what your surface needs than sell you a service it doesn't.
Sources & further reading
- Acrylic Coatings and Compatibility Technical Overview (U.S. Environmental Protection Agency)
- NOAA Climate Data for Southwest Florida (humidity and temperature normals) (NOAA National Centers for Environmental Information)
- Pool & Hot Tub Alliance: Residential Pool Safety Guidelines (Pool & Hot Tub Alliance)
- Florida Building Code - Residential Construction Standards (Florida Department of Business and Professional Regulation)
- National Oceanic and Atmospheric Administration (named in this article) (National Oceanic and Atmospheric Administration)
Claim-by-claim audit (5 checked)
- “Per guidance from the Pool & Hot Tub Alliance and general safety standards for wet pedestrian surfaces, adequate slip resistance on pool decks is not just an aesthetic preference; …” (cited → phta.org)
- “Skipping or rushing the dry time after stripping creates its own cloudiness problem, and in our humid Gulf Coast climate (with average relative humidity regularly above 70 percent,…” (cited → ncei.noaa.gov)
- “A water-based acrylic applied over a solvent-based acrylic can lift the old layer because the solvents in the new product partially dissolve and destabilize the existing film befor…” (reasoning shown in the article)
- “In neighborhoods where the water table sits high, this problem tends to be more pronounced.” (rewritten to what the article can stand behind)
- “The original builder-applied sealer is often just a few years old, already showing wear, and may not have been applied over properly prepared or sanded joints.” (rewritten to what the article can stand behind)
Get started
Request a free quote
Tell us what you need. No pressure, and a real person gets right back to you.